Sunday, August 9, 2015

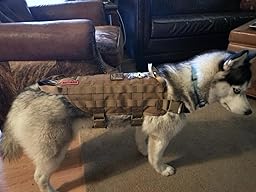
OneTigris Cotton Canvas Dog Pack

OneTigris is a dog lover company, the original idea in producing dog equipment is remind not to forget your best friend. Let them still be your companion when you are outdoors. Did you ever go on a trip or adventure with your dog?
Come on, try it; you will have a great time!

Vintage in design but unique in fashionable appearance. Free wild style the dog pack is, can match your pet dog anytime and anywhere, not only a concrete expression of the concept of simple life, but also a natural manifestation of special temperament.
Consideration also has been given to the practical applicability, OneTigris Cotton Canvas Dog Pack is made of comfortable cotton canvas material, by which will not make your dog feel tired of wearing it and hurt fur. Come with OneTigris Dog Pack, it's hard for you to worry about how to carry food, water or some small EDC items, walking with your dog become so easy.
Fit for Alaskan, Samoyed, Shepherd, Su Mu, Golden, Tibetan mastiff etc.

Specifications of dog pack:
Material: Cotton Canvas
Structure: 2 main zipper pouch, 2 front pocket
Single Pouch Width: 7 inch
Single Pouch Length: 9.6 inch
Front Pocket Length: 7.7 inch
Front Pocket Width: 5.3 inch
Chest: 26.5-40.5 inch (with adjustable strap)

Note:
Please kindly allow for 1-2cm measurement error due to different measurement methods
The images may exist a little bit color difference due to camera and computer
For long-term using, hand wash with cold water and hang to dry is suggested


Customer Reviews for OneTigris Cotton Canvas Dog Pack 
Product Qualities
This is a very sturdy, well-made product. The canvas has some heft to it and is a nice heavy weight. No issues with the stitching. I like the oversize zipper pulls as well. It should serve well in winter with gloves on etc. Although we just got ours the other day, we've already put in about 10 miles with it in different types of terrain. We followed some washed out creek beds, went up and down steep embankments, through thick brush, hardwood stands, and open easy going trails. The pack excelled in all areas. The pack does not shift at all. It stays right where it should centered on his back. I will say this though, i had equal weight on both sides (canned goods).

Behavioral Benefits
My dog didn't exhibit any signs of discomfort, no tugging or pulling etc. He didn't even look back at it after the first 50 feet or so. In fact, he seemed more focused while wearing it and definitely became more of a follower. He is trained to walk on my left side and not to walk ahead of me but from time to time has a tenancy to become distracted and drift about a foot further than he should. He didn't need to be reminded one single time while wearing the pack. The affect of "having a job" produced a quite remarkable improvement in his focus.

Fit
My dog is an Airedale Terrier and is quite deep in the chest with a slim waist and a slender neck so i had some concerns as to whether or not it would fit correctly. The adjustment is maxed out on his waist and nearly maxed out on his chest. neck is fine. I wanted to add some photos with measurements for reference to help others that may be considering this pack. I know there are photos of a dog in the product page, but they don't tell you anything about the dog. My dog stands 24" at the shoulder and his chest is 29" in diameter measured across the shoulder blades and just behind his armpits. He weighs 56 lbs. He's only 2 and probably has some filling out to do, so the extra length on the straps is a good thing.

Final Thought
I use a martingale collar situated just behind the ears and jawline for all of our excursions, training sessions, etc. I did not use the ring on top of the pack the pack and truth be told, I wouldn't try to use this as a harness. I'd likely just buy a proper harness for that. We currently don't do any activities that require him to walk in front of me (scent tracking, sled pulling etc.). So we only tested it with him walking along side me. Bottom line, It's clearly designed to be a backpack, not a harness. For those interested in being dragged behind their dog by a harness, you may want to explore other products.

Tuesday, July 21, 2015

OneTigris SNIPER Tactical EDC Water Bottle Pouch


OneTigris SNIPER Tactical EDC Water Bottle Pouch Description

  • Just the right size for most 32oz Water Bottles. Nalgene Bottle fits great.Main compartment is 9.8" x 4" diameter.
  • 6.3"x 3.9" Front pouch is perfect for coffee, tea, first aid, cell phone, and more
  • Heavy duty MOLLE straps on back of pouch allow it to attach to other gear with PALS webbing or be worn on a belt.
  • Velcro on front and on top to add your favorite moralle patch. Smooth operating, snag-free, oversized zippers with paracord pull.
  • Ideal for hunting, hiking, camping, fishing, riding or travel.

Customer reviews on OneTigris SNIPER Tactical EDC Water Bottle Pouch:

"
I had two of these, now I have 3. I selected this the one tigris water bottle holder the first time because it was one of the few that included a shoulder strap. This is a great water bottle holder. It is large enough to hold a tall insulated thermos water bottle (16 inches) and still comfortably close. What I really love is the versatility for carrying. There's the molle straps on the back so it can attach to any molle system or simply to your belt. Because of the molley webbing, if you attach it to your belt, you can do so at various heights. It also has a rather robust metal clip on the back which can be used to hang from a belt loop or attach to something else. The included nylon should strap is handy too, I use that if I'm giving it to one of the little ones that doesn't have a belt.

I've attached one of these to the side molle webbing on a backpack, which lets me access the water bottle without taking the pack off by comfortably reaching to my side. Because the holder is deep, I usually don't bother to zip the top closed...there's little danger of the water bottle falling out. I've attached another to the side of my laptop case using the molle straps. This is great at the airport. After going through security I can buy and drop a water bottle in there and free up one of my hands. It's also not bad for carrying a beer/soda can around at a fair on your belt to keep your hands free. Because its so tall, I've walked around with an open can in there without spilling any, though it does have a small grommeted hole in the bottom to let liquid out if it were to spill.

The pouch on the front is handy when I give this to one of my kids. They can put money or a small wallet in there to carry their cash. On a bike ride, it also fits a compact first-aid kit well. I also got some molle clips from one tigris. They fit nicely on these and add some additional versatility for attaching non-molle items to the front molle webbing.
So far, these things have held up really well. When the kids got them muddy I even ran them through the washing machine."

OneTigris SNIPER Tactical EDC Water Bottle Pouch Youtube video review


Buy OneTigris SNIPER Tactical EDC Water Bottle Pouch: http://amzn.to/1C860gA


Tuesday, July 7, 2015

OneTigris Tactical Dog Training Molle Vest Harness

OneTigris Tactical Dog Training Molle Vest Harness Specification:
  • MOLLE on both side of the harness for use of any MOLLE or MALICE-type pouches, attached with magazine pouches, water bottles, food snacks, etc
  • Velcro panel down the back for any patch furniture
  • Grid design lining for breathability. Soft pad insert on the collar to prevent chafing on your dog's neck
  • Two carry handles are attached to both the front and back of the harness and has two attachment points for a leash
  • 5 Size available, fit dog's Shoulder to back leg lengths 28.5cm to 54cm
Customer review on OneTigris Tactical Dog Training Molle Vest Harness
Does your wife make you walk a dog that is the size of a glorified hamster? Does your dog constantly get picked on and beat up at the dog park? Or is your dog a 150 pound wolf you rescued as a pup from the wild after fighting off hordes of lawless poachers? Whatever dog you own, look no further for an absolute necessity to your K9's load-out!

What you are looking at here is an excellent deal on a Tactical dog vest to make your K9 partner just as awesome as you are for searching out tactical gear. Whether your K9 partner is a professional bomb sniffing dog or you just want your dog to be "da bomb" at the local dog park, then this vest is for you! Not only do you have a wide selection of colors to blend with environment and coat patterns, you have a plethora of sizing options to fit the smallest or breeds up to the largest of wolf-hybrids out there! Make sure to measure your dog well though, as I bought a size medium for my 38 pound lion-taming wolf thinking it would be a bit large, and it ended up fitting perfect. Buyer beware though, this vest has the ability to turn even the daintiest of teacup poodles into combat ready, pitbull-killing, wolfpack of one because the world cannot handle two, best K9 partner you ever had! If you think you can handle that, then read on. Otherwise, turn back now and resume searching out Martha Stewart dog costumes.

Now lets talk about construction. Is it made in America? Sadly no. Was it forged in Middle Earth deep in the fires of Mount Doom? Maybe... That is just how tough this puppy is (no pun intended). The chassis starts on a heavy duty nylon with a breathable mesh sewn underneath to keep your K9 cool when combat gets heated. Next you have PALS (Pouch Attachment Ladder System) sewn down the entire length of both sides. This gives you the ability to load down your beast with all sorts of necessities such as water pouches, spare magazines for your primary and secondary weapons, kibble for those overnight missions, hand grenades, med-kits, short wave radio, K9 cam to give HQ a visual of your AO, and so much more! Heck, you could probably attach a turret mounted UZI and have your trained squirrel ride your beast into battle! Next, on the middle of the vest are two heavy duty nylon grab handles, both forward and aft, for a handler to easily maneuver even the biggest of K9 breeds. Sewn in next to each of those grab handles are two hooks for leashing your beast in order to prevent any collateral damage when civilians are present. To finish off this awesome harness you have a wide heavy duty Velcro strip running the entire length of the vest to attach whatever patch furniture your little heart desires.

If you're still not convinced, think of it this way: If Rambo had a dog, his dog would have this vest!


Buy OneTigris Tactical Dog Training Molle Vest Harness: http://www.amazon.com/OneTigris-Tactical-Training-Molle-Harness/dp/B00PZWDMX0/


Video reviews for OneTigris Tactical Dog Training Molle Vest Harness


Wednesday, June 3, 2015

The Most Common Turkey Calling Mistakes to Avoid

GAFP_1504_P315_IN_1A buddy of mine has a saying when we are introducing a new hunter to wild turkey hunting. He tells them, “We are turkey hunting experts. We have made every mistake in the book at least twice.”
Where we grew up, the reintroduction of wild turkeys was relatively recent; we weren’t brought up in a turkey-rich environment, with centuries of hunting tactics and tradition under our turkey vests. We learned the ropes by reading books and magazine articles and trial and error. Lots of error.
Mistake Number 1: Getting Busted
The temptation to get closer to a gobbling bird can be overwhelming. It doesn’t matter if you roosted the bird the evening before, struck him on the roost, or after fly down. You want to close the distance and see that gobbler!
GAFP_1504_P131_WV_2The problem is the terrain and thickness of the woods can distort the distance between you and the bird. Getting busted can be avoided with pre-season scouting so you know intimately the lay of the land you hunt.
Roosting a bird can give you a gauge as to how close you can creep in and set up. After a few failed attempts in various scenarios you get a sense of what that distance should be.
But always set up further than you want to. The bottom line is that if you can hear a bird gobble, no matter how far away, that bird can hear your calls and can be worked. For instance, I was calling to two strutting gobblers in a small clearing below the trail I was set up on.
While calling to these Toms I heard a distant gobble behind me that sounded miles away. I ignored it and remained fixated on the birds in front of me. All of the sudden that far-off bird gobbled less than 20 yards behind me and I almost dropped my shotgun.
Mistake Number 2: Calling Too Much or Not EnoughThe temptation to use our calls to get a hot gobbler to go off is irresistible.
Often when you keep hammering on the calls to hear that gobble the bird hangs up. It’s quite content to answer your calls hundreds of times if that’s what you want to hear, but it’s not budging. Put the calls away and use an underutilized call: Silence.
turkey_5Chances are good that bird will become curious about what happened to the hen that he was serenading. Give it time, and after a good 10 minutes let out a light yelp. If he doesn’t answer, give it some more time: gobblers often commit silently.
But if he hammers back at you at the same distance, it’s time to move to a different angle, which may break him, or find a more cooperative bird.
Some new hunters are led to believe you need to be a champion caller to kill a wild turkey, so they do little squeaks and hope they don’t scare away a Gobbler. You may need to be pretty good caller to bring in a woods-wise tom 4 years old, but 2- and even 3-year-old birds can be quite cooperative.
Keep it simple at first. Push pin calls have buried a load of turkeys, and it’s not hard to make decent yelps scratching a slate or working a box call. Diaphragm mouth calls have a reputation of being hard to master. Trim off as much of the tape surrounding the latex membrane and frame as needed and start squawking.
I once “called” a gobbling 2-year-old across a road when my truck door squeaked. True story.

Tuesday, June 2, 2015

Camp Fire vs. Survival Fire vs. Cooking Fire

20140915_033056
Over the years I have seen a great deal of confusion between a camp fire, cooking fire and a survival fire. Main Stream Survival Media (Survival TV Shows) have shown us camp fires and cooking fires and portrayed them as fires fit to be survival fires. Another major discrepancy I see on these shows is the amount of firewood gathered/collected to last an entire night. I always seem to calculate how long their wood pile will last in my head and I can never reach more than an hour or two of substantial fire. I have been a long time…
Survival Fire/Long Fire:
20140915_033056
Notice the length of an survival fire is at a minimum the length of your head to waist to ensure core body warmth and this fire should never be allowed to die down to just coals but should have at least 1′ flames to ensure your warmth through even the coldest night. Ideally a survival fire should be the entire length of your body to ensure maximum warmth (if it were the dead of winter I would make the same fire full length of my body and have flames roughly the height of the shelter). Notice that pile of wood to the rear of the fire, that amount of wood is more than I have ever seen on any survival show and that was just one of my three piles of wood to get me from 3am until daylight. I had a larger pile just out of frame opposite of shelter to act as a quasi wind break if needed and one by my body to be within arms reach so I could easily fuel the fire throughout the night. Quick tip for survival fires to increase your warmth throughout the night: assuming you are laying directly on the ground or on a pine limb bed you can start your fire initially where your bed will be located as you gather firewood for the night. Then you cover the coal bed with a small layer of dirt (1-2″) which will heat you from below as you get reflective heat from your shelter (in survival every advantage counts!). 

Cooking Fires:

20140725_212642
1) There are several varieties of cooking fires and the one pictured above is one I use for boiling, remember boil over flame, cook over coals. The flame should nearly engulf the pot to ensure a quick boil, this fire would then be reduced to a very low flame that does not reach the bottom of the pot or merely a coal base to continue to cook soup after boiling. Firewood needed: mix of hard and soft wood to get a strong fire base going and enough to keep a strong flame for a minimum of 15 minutes (normal boil time for an 8 qt. pot).
20140725_214839
2) Strong coal base (hardwoods burnt down) on the sides of the fire with a low and slow flame in the center (using dense hardwoods). This is my multipurpose cooking fire in which I use the center of the fire to slow cook soups (great for venison chilli) and the exterior coal base to cook breads or anything that requires slow cooking. Firewood needed: softwoods to get the fire going and 4-6 arm sized logs to build a strong coal base  and an additional two logs and a few smaller sticks (finger sized) to keep flame in the center if needed.
3) The Dakota Fire Pit/Hole: This cooking fire is extremely effective when you only have a very limited amount of firewood to deal with. With this fire one can easily cook an entire meal with on wrist sized stick that is roughly 6′ long. A true one stick fire, to utilize the bark for a birds nest for fire starting, batoned sticks down to finger sized sticks and feed as needed to fuel your fire. This is a very efficient fire so don’t allow the flame above the level of the ground to allow for the best cooking environment possible.
20140426_205917
4) Swedish Torch: See My Review of this Fire Method Here (LINK). As some of you may know I’m not a huge fan of this method with out a chain saw and I don’t carry a chain saw with me into the woods so this method of cooking is rarely used by me. It is fairly effective once you get the fire going and is a sort of upside down fire that seems to work best for larger bush pots (after about 30 minutes anything bottle sized will simply tip over as there isn’t enough support for such a small surface area). I personally chalk it up to a campground or base camp fire where you want to impress someone with a camp trick, but hundreds of people love this method, I guess I’m just a little too attached to my tripod cooking method when in the woods.

Camp Fire:

20140704_223038
This is what I see the most of on survival TV shows a mid-sized fire with little to no reserve wood to continue the fire once the base burns down. This is the type of fire that you roast a marshmallow over or cook a hot dog on yet at the same time this fire can easily evolve into a long fire or into a cooking fire once a coal bed is established.  This fire basically consists of softwood and hard wood mixed together (think tepee of softwood with a log cabin of hard woods around it or an upside down fire) and is usually a fire lay that is roughly knee height. Reserve fire wood for this type of fire would be minimal hard wood to help extend the fire an hour or two in case conversations abound.

Today’s survival media has provided us with a misguided sense of what a survival fire is and what it takes to maintain one. In all of the “survival” TV show’s I have watched I have yet to see anyone truly explain a long fire/survival fire or the fire requirement of this type of fire without the ability to cut substantial fire wood (i.e. no available ave or substantial belt knife). So I thought I would create this post to right the wrongs I believe have been done to those who unfortunately learn from survival TV. So please remember a survival fire is a big fire that is at least as long as your torso and you can never have enough fire wood. Once you have a pile of sticks you pick up off the ground that is to your waist take a breath and then realize you need at least one or two more piles that size to make it through the night warm! So survival fire rules to live by: 1) big fire=survival fire; 2) you never have enough fire wood; 3) if you can cheat in a survival situation do it, Mother nature never fights fair! (i.e. hot coals buried under your bed); 4) If you can make a more substantial shelter to control your core temperature better by all means take that advantage.

OneTigris Waist Pack - Surprisingly awesome!

Hey EDC-ers! Long time lurker, first time poster. I'm excited to join this amazing community.

So I just purchased a OneTigris waist pack, essentially a Maxped Proteus clone. I was a little wary, considering I know nothing of the company, and it was coming from China, but I could not be happier with my choice.

[IMG]

I was looking for a waist pack that could be worn multiple ways (waist, shoulder, MOLLE), that could fit what I needed on a daily basis for work and play in as small a package as possible. I was looking seriously at the Proteus, but the price tag kept me at bay. The OneTigris then came across my path, and I figured "Hey...if it sucks, I'm only out 30 bucks". When I got the back in and packed it, all I could say was "HOLY CRAP!!" This sucker can pack it in!

The stitching looks well done, and it feels solid. The 1000d nylon feels sturdy and hearty, like it'll last a good long while. I can't speak to the strength in the field/bush, but for my purposes (work, around town), it'll do just fine. The zippers, while they don't say YKK, feel as such. They glide smoothly along the teeth. It'll take some breaking in to get the shape of the pack just right, but overall I'm impressed by the quality.

[IMG]

The load out I can fit in this thing is ridiculous compared to my expectations.
(certain items removed as I'm at work and currently using them)

[IMG]

Main pocket: iPad Mini in Apple Smart Case, PS Vita in a thin pouch, Moleskine large Volant, Moleskine small journal, checkbook, Word notebook, Kindle, Oakley Bullet eyeglass case.

[IMG]

Front pouch: Anker Astro e5 external battery, lightning cable, micro USB cable, pens, Smith & Wesson pocket knife, mini screwdriver with bits, USB charging block (and still room for more).

Side pockets can fit plenty (i.e. large vape box mod with tank attached, iPhone 6 in slim case). Not as much MOLLE attachments on this as I would have liked, but again...I wanted small. I'll be ordering the bigger size (Sabercat clone) for my pouches to attach. The weight is very minimal, feels very comfortable on the hip loaded out (although I use the carry handle more).

[IMG]

All in all, I can only recommend this pack to anyone looking for a solid waist pack for EDC, but doesn't want to jump in with both feet in the pricey Maxped pool. Honestly the biggest deciding factor for me was the excellent attention paid to customer service. I posted a question on the OneTigris Facebook page, and within minutes had one of the heads of the company friend me and send me a message. He continued to speak with me over a few days, answering any questions I had prior to purchase. Post purchase he continued to thank me for my business, and thanked me for the review I left on the Amazon page. Apparently once a month they choose 2 reviews as the best, and completely refund the price of the purchase. To me, that beats out any other company and they have my business for life.

I get the sense they are a young company, and are still working on products and designs. I'm excited to see what they produce in the future!

More from: http://edcforums.com/threads/onetigris-waist-pack-surprisingly-awesome.128804/ 

Monday, June 1, 2015

MAKE A PLASTIC BOTTLE FISHING TRAP

MAKE A PLASTIC BOTTLE FISHING TRAP

In a survival situation, every little bit of food you can procure adds to your chances of staying alive. If you’re in an area with fish, one of these small pop bottle funnel traps can be a great way to catch small minnows for either bait, or food if conditions are really bad.
I’ve been using these types of minnow traps for as long as I can remember. They are a great way to catch bait, and are supper simple to make. They’re also pretty much free, and a great way to recycle those old water bottles.
plasticbottleinstructions

HOW TO MAKE THE PLASTIC BOTTLE FISH TRAP

  • With a Sharp Knife, carefully cut off the top of the pop bottle (as shown above). You can use pretty much any kind of plastic water bottle to make this type of trap.
  • Shove the head or cone of the bottle into the body of the bottle. To further secure the head, you can poke a couple holes through the cone and use a bit of fishing line to tie the sections together.
  • Throw in a couple small rocks to anchor the bottle to the bottom, poke a couple small holes in the bottle, and then add some small scraps of bait or small insects to attract the fish.
  • Place the bottle in some shallow water, and secure it with some line. Once the fish swim through the funnel, they will not be able to swim back out.
  • The more of these you can set, the better chances you have of catching something substantial enough to sustain you.

 EXAMPLES OF PLASTIC BOTTLE FISHING TRAPS


plasticbottlefishtrap
fishtrap